纯前端实现:切片上传断点续传 。断点续传需要在切上上传的基础上实现
前端之前上传OSS,无需后端提供接口。先上完整代码,直接复制,将new OSS里的参数修改成自己公司OSS相关信息后可用,如遇问题,请继续往下看。
oss官方文档
https://help.aliyun.com/document_detail/111268.html?spm=a2c4g.11186623.6.1111.5a583a07LknRUO
代码允许所需环境:vue + element + ali-oss
优惠券网站 https://www.cps3.cn/
安装ali-oss: cnpm install ali-oss
- 代码实现
<template> <div class="dashboard-editor-container"> <el-upload class="upload-demo" action="" ref="upload" :file-list="fileList" :limit="2" :on-change="handleChange" :on-remove="handleRemove" :auto-upload="false" accept="" > <el-button slot="trigger" size="small" type="primary">选取文件</el-button> <el-button style="margin-left: 10px;" size="small" type="success" @click="submitForm">上传到服务器</el-button> <el-button style="margin-left: 10px;" size="small" type="success" @click="resumeUpload">继续</el-button> <el-button style="margin-left: 10px;" size="small" type="success" @click="stopUplosd">暂停</el-button> <el-button style="margin-left: 10px;" size="small" type="success" @click="abortMultipartUpload">清除切片</el-button> </el-upload> <el-progress :percentage="percentage" :status="uploadStatus"></el-progress> </div> </template> <script> let OSS = require('ali-oss') // 引入ali-oss插件 const client = new OSS({ region: 'oss-cn-shanghai',//根据那你的Bucket地点来填写 accessKeyId: 'LTA*********RaXY',//自己账户的accessKeyId accessKeySecret: 'uu1************GiS',//自己账户的accessKeySecret bucket: 'a******o',//bucket名字 }); export default { data () { return { fileList:[], file: null, tempCheckpoint: null, // 用来缓存当前切片内容 uploadId: '', uploadStatus: null, // 进度条上传状态 percentage: 0, // 进度条百分比 uploadName: '', //Object所在Bucket的完整路径 } }, mounted() { // window.addEventListener('online', this.resumeUpload); }, methods: { // 点击上传至服务器 submitForm(file) { this.multipartUpload(); }, // 取消分片上传事件 async abortMultipartUpload() { window.removeEventListener('online', this.resumeUpload) const name = this.uploadName; // Object所在Bucket的完整路径。 const uploadId = this.upload; // 分片上传uploadId。 const result = await client.abortMultipartUpload(name, uploadId); console.log(result, '=======清除切片===='); }, // 暂停分片上传。 stopUplosd () { window.removeEventListener('online', this.resumeUpload) // 暂停时清除时间监听 let result = client.cancel(); console.log( result, '---------暂停上传-----------') }, // 切片上传 async multipartUpload () { if (!this.file) { this.$message.error('请选择文件') return } this.uploadStatus = null // console.log("this.uploadStatus",this.file, this.uploadStatus); this.percentage = 0 try { //object-name可以自定义为文件名(例如file.txt)或目录(例如abc/test/file.txt)的形式,实现将文件上传至当前Bucket或Bucket下的指定目录。 let result = await client.multipartUpload(this.file.name, this.file, { headers: { 'Content-Disposition': 'inline', 'Content-Type': this.file.type //注意:根据图片或者文件的后缀来设置,我试验用的‘.png’的图片,具体为什么下文解释 }, progress: (p, checkpoint) => { this.tempCheckpoint = checkpoint; this.upload = checkpoint.uploadId this.uploadName = checkpoint.name this.percentage = p * 100 // console.log(p, checkpoint, this.percentage, '---------uploadId-----------') // 断点记录点。浏览器重启后无法直接继续上传,您需要手动触发上传操作。 }, meta: { year: 2020, people: 'dev' }, mime: this.file.type }); console.log(result, this.percentage, 'result= 切片上传完毕='); } catch (e) { window.addEventListener('online', this.resumeUpload) // 该监听放在断网的异常处理 // 捕获超时异常。 if (e.code === 'ConnectionTimeoutError') { // 请求超时异常处理 this.uploadStatus = 'exception' console.log("TimeoutError"); // do ConnectionTimeoutError operation } // console.log(e) } }, // 恢复上传。 async resumeUpload () { window.removeEventListener('online', this.resumeUpload) if (!this.tempCheckpoint) { this.$message.error('请先上传') return } this.uploadStatus = null try { let result = await client.multipartUpload(this.file.name, this.file, { headers: { 'Content-Disposition': 'inline', 'Content-Type': this.file.type //注意:根据图片或者文件的后缀来设置,我试验用的‘.png’的图片,具体为什么下文解释 }, progress: (p, checkpoint) => { this.percentage = p * 100 console.log(p, checkpoint, 'checkpoint----恢复上传的切片信息-------') this.tempCheckpoint = checkpoint; }, checkpoint: this.tempCheckpoint, meta: { year: 2020, people: 'dev' }, mime: this.file.type }) console.log(result, 'result-=-=-恢复上传完毕') } catch (e) { console.log(e, 'e-=-=-'); } }, // 选择文件发生改变 handleChange(file, fileList) { this.fileList = fileList.filter(row => row.uid == file.uid) this.file = file.raw // 文件改变时上传 // this.submitForm(file) }, handleRemove(file, fileList) { this.percentage = 0 //进度条置空 this.fileList = [] }, } } </script> <style scoped> </style>如果相关依赖已经安装完毕,但是上述代码操作时仍有报错,请检查以下问题
const client = new OSS({ region: 'oss-cn-shanghai',//根据那你的Bucket地点来填写 accessKeyId: 'LT******XY',//自己账户的accessKeyId accessKeySecret: 'uu*********GiS',//自己账户的accessKeySecret bucket: 'a******io',//bucket名字 });- 上述信息放在前端会存在安全问题,如在项目中使用尽量由后端接口提供。或使用STS临时授权。demo中没有,请自行探索。
https://www.alibabacloud.com/help/zh/doc-detail/100624.htm?spm=a2c63.p38356.879954.5.7a234d04IQpf5I#concept-xzh-nzk-2gb
配置项中信息可以问后端或者运维,bucket的名字必须是你OSS上存在的且你有权限访问的,不然会一直报
Pleasr create a busket first或者一直报跨域
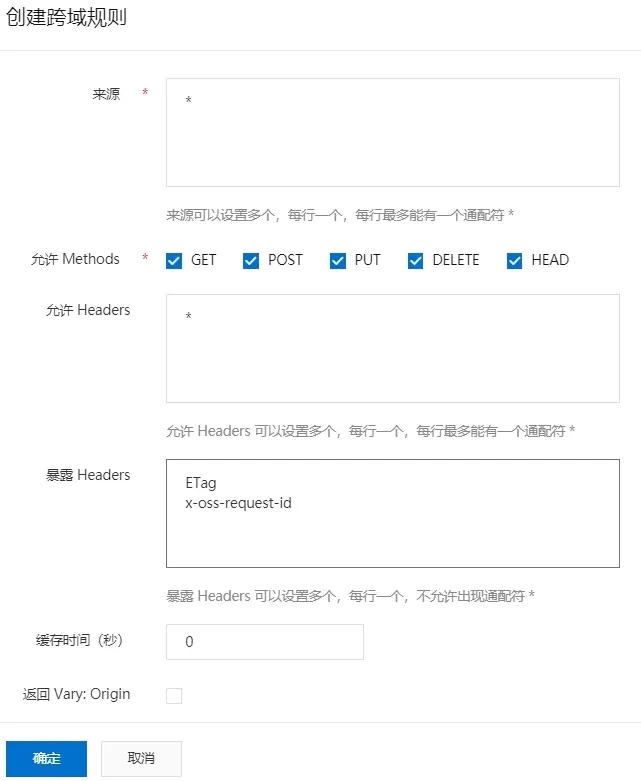
当遇到跨域时,或者遇到报报错信息中有
etag时,请检查OSS配置,然后找有OSS服务器权限人员进行配置:
window.addEventListener('online', this.resumeUpload)用于监听网络状态(断网状态和连网状态),实现断网后恢复网络自动上传就必须设置监听。
window.removeEventListener('online', this.resumeUpload)取消监听。如果不设置取消监听,联网状态下会一直处于进行上传,因为一直满足监听条件`
headers: { 'Content-Disposition': 'inline', 'Content-Type': this.file.type //注意:根据图片或者文件的后缀来设置,我取得是文件的type,具体为什么下文解释 },'Content-Type': this.file.type`的作用:加了在文件上传完毕后,访问文件链接时可以直接查看,否则会直接下载。
文件上传完毕后查看,可以去resule.res.requestUrls中去取,但是注意要去点地址后面的
?uploadId=******
上述代码只是demo,代码以实现功能为主,并不严谨,请自行完善。如对各位有所帮助,请推荐,谢谢各位!。
以上就是全部内容,如有疑问,敬请留言!如有问题,请指出,谢谢~~
热门文章
- 宠物粮食加工厂设备生产厂家排名第一的是哪家(宠物粮加工机器)
- 流浪狗领养平台(流浪狗领养平台电话)
- 宠物粮公司排名(宠物粮厂家)
- VPN试用 | 3月23日21.8M/S|免费VPN/Clash/Shadowrocket/SSR/V2ray免费节点链接地址
- VPN试用 | 2月25日21.4M/S|免费VPN/SSR/Clash/V2ray/Shadowrocket免费节点链接地址
- VPN试用 | 3月20日21.6M/S|免费VPN/SSR/V2ray/Shadowrocket/Clash免费节点链接地址
- 猫咪三针疫苗中间间隔多久 猫咪三针疫苗中间间隔多久打
- 狗粮批发市场进货渠道小包装多少钱一吨(狗粮批发市场在哪里)
- 如果我们将日期成分和时间成分作为TIMEDIFF()函数的参数,MySQL将返回什么?
- VPN试用 | 2月14日22.9M/S|免费VPN/V2ray/Clash/SSR/Shadowrocket免费节点链接地址